How to Build a Fintech QR Scanner Screen in Flutter (Full Code + Preview)
Every wallet app eventually needs a scan-to-pay screen, but shipping one usually means dragging in a camera plugin before the design even exists. This tutorial builds a Revolut-style QR viewfinder in pure Flutter: the "camera feed" is a painted gradient, a CustomPainter draws the 250×250 scan frame with rounded corner brackets and an indigo scan line, and translucent Gallery, Torch and "Show my QR code" controls float above it. You end up with a self-contained dark screen you can drop into any fintech prototype and later back with a real camera stream.
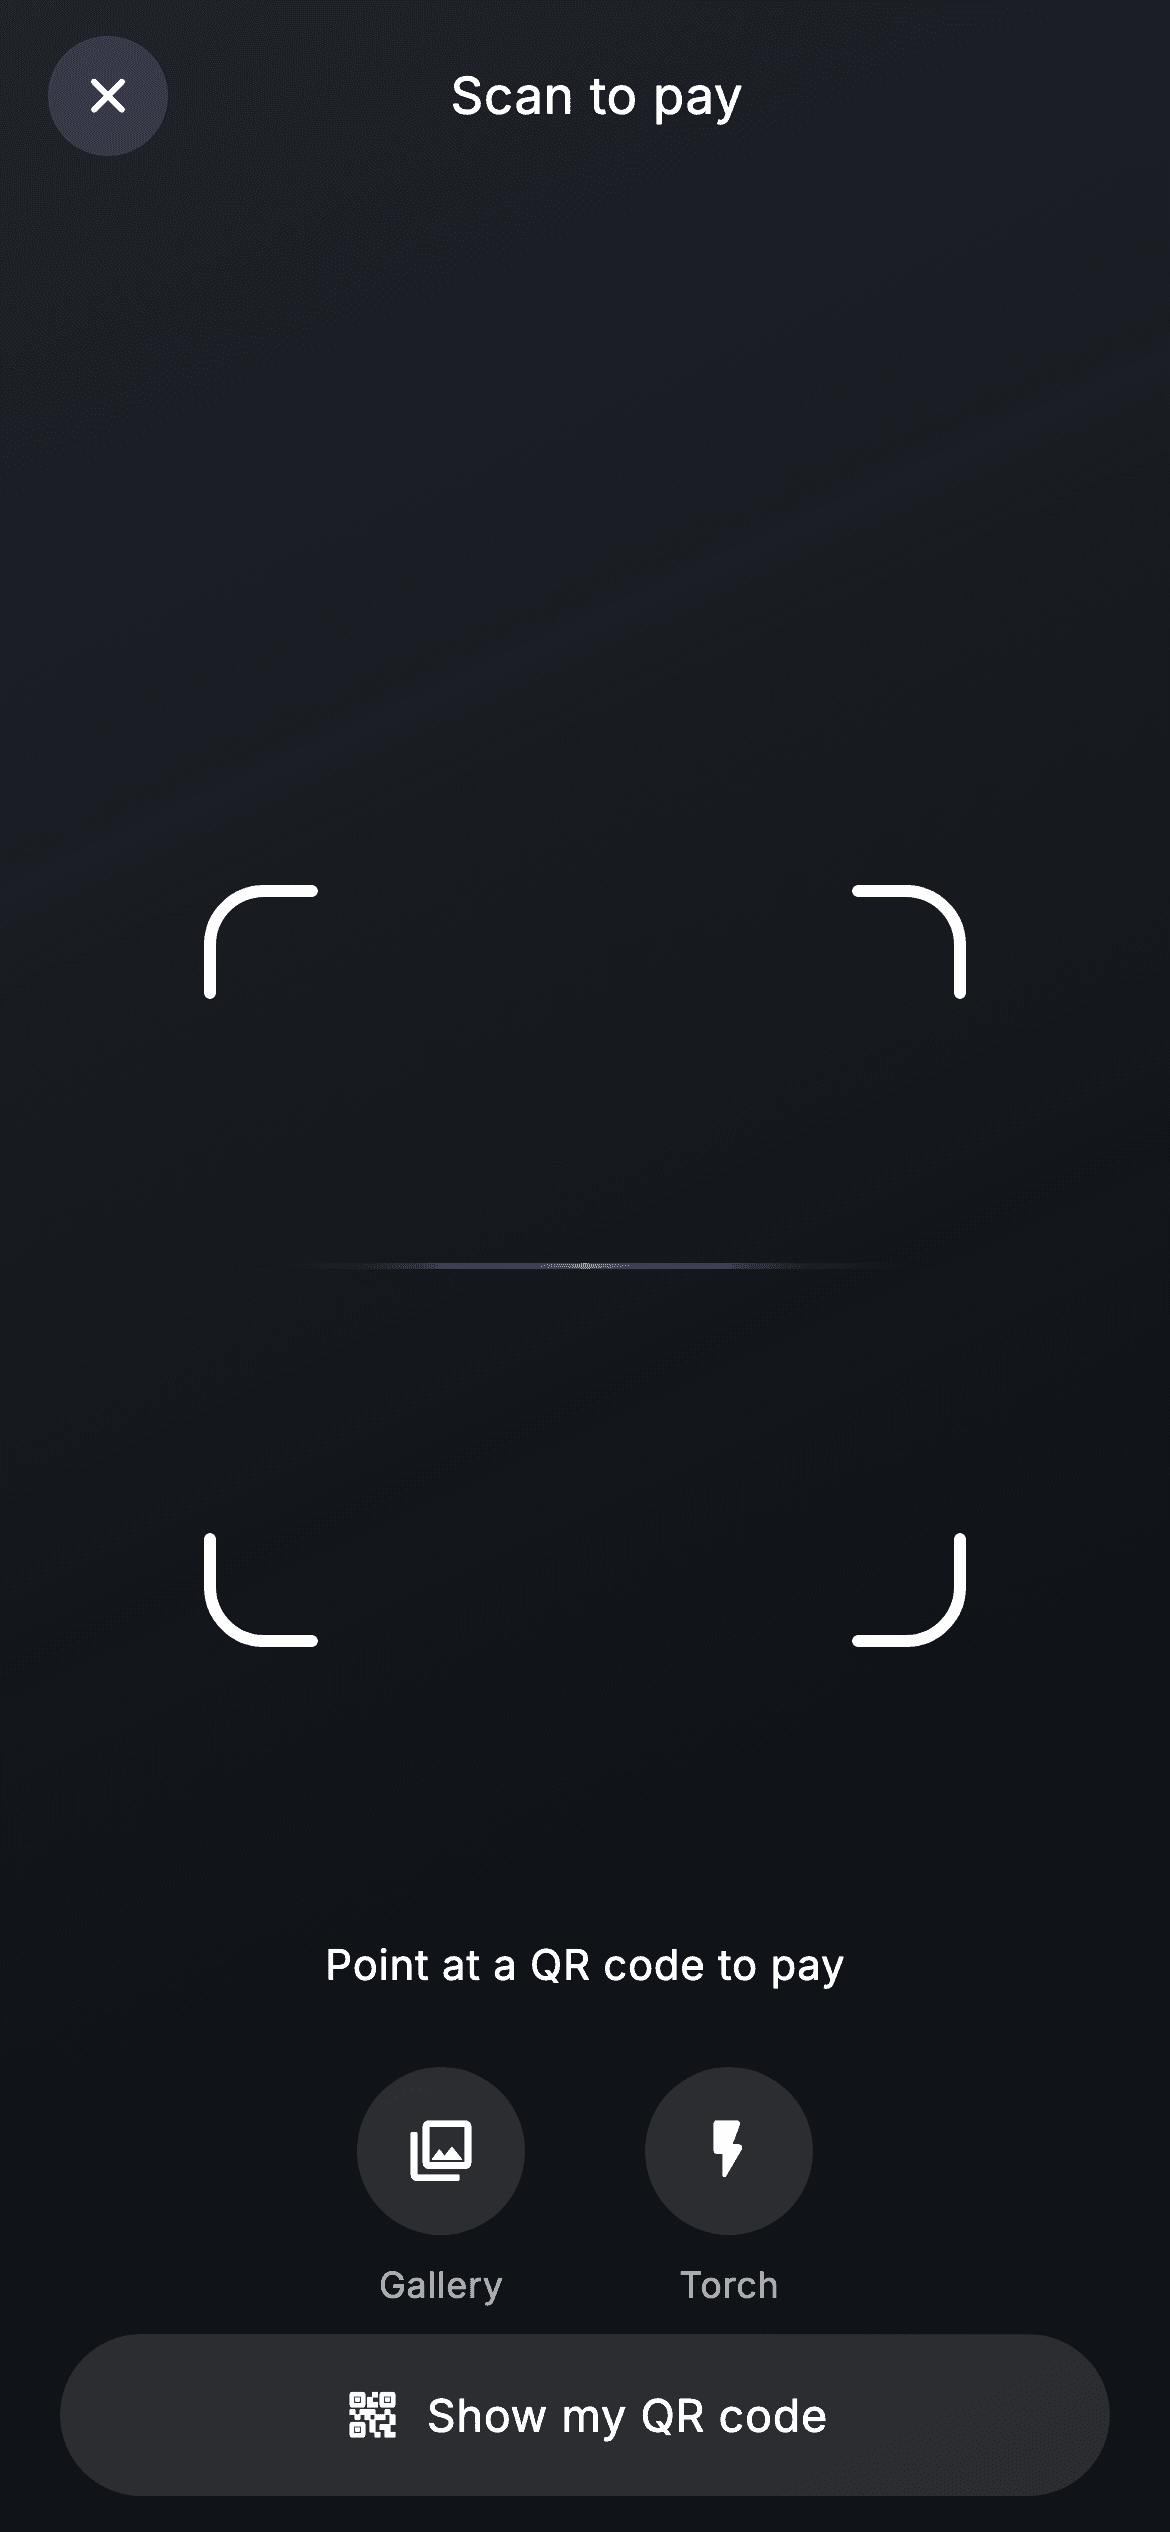
What you'll build
- ✓A full-screen mock camera feed painted as a three-stop dark gradient — no camera plugin required
- ✓A 250×250 scan frame whose four rounded corner brackets are each drawn as a single path in a CustomPainter
- ✓An indigo scan line that fades out at both ends via a transparent-edged LinearGradient shader
- ✓Frosted Gallery and Torch round controls plus a pill-shaped 'Show my QR code' button, all at 12% white
- ✓A locally forced dark theme so the scanner renders correctly inside an otherwise light app
Step-by-step build
Create the file
Add a new file at lib/fintech_scan_qr/fintech_scan_qr_screen.dart in your Flutter project.
Register the bundled fonts
No external packages — this is pure Flutter. It does bundle its design font (Inter), so drop the font file into fonts/ and declare it in pubspec.yaml:
flutter:
  fonts:
    - family: Inter
      fonts:
- asset: fonts/Inter-Regular.ttfBuild it, piece by piece
Here's how the screen goes together. Each block below is a real slice of the code with a plain-English explanation — paste them in order, or grab the whole file from the next section.
A stateless viewfinder with two exits
import 'package:flutter/material.dart';

/// Scan QR — a mock camera viewfinder for paying via QR (Revolut-inspired).
///
/// Self-contained per CONVENTIONS.md: pure Flutter only, the exact design font
/// (Inter) is bundled under `fonts/`, no real camera/network (the "feed" is a
/// painted gradient), and the screen forces its own dark theme. The scan frame
/// with animated corner brackets and bottom controls read like a live scanner.
class FintechScanQrScreen extends StatelessWidget {
  const FintechScanQrScreen({
    super.key,
    this.onBack,
    this.onMyCode,
  });

  final VoidCallback? onBack;
  final VoidCallback? onMyCode;

  static const String _font = 'Inter';
`FintechScanQrScreen` is a `StatelessWidget` taking just `onBack` and `onMyCode` — because the feed is a painted mock, there is no camera controller or scan result to hold, so state would be dead weight. In a real integration those two callbacks are the screen's only contract: close the scanner, or flip to the user's own code. The font name lives in `static const String _font = 'Inter'`, which matters later because the private `_RoundControl` class reaches back to it as `FintechScanQrScreen._font` instead of duplicating the string.
Layering feed, frame and chrome in one Stack
  @override
  Widget build(BuildContext context) {
    return Theme(
      data: ThemeData.dark(useMaterial3: true),
      child: Scaffold(
        backgroundColor: Colors.black,
        body: Stack(
          fit: StackFit.expand,
          children: <Widget>[
            // Mock camera feed.
            const DecoratedBox(
              decoration: BoxDecoration(
                gradient: LinearGradient(
                  begin: Alignment.topLeft,
                  end: Alignment.bottomRight,
                  colors: <Color>[
                    Color(0xFF20242B),
                    Color(0xFF14171B),
                    Color(0xFF0C0E11),
                  ],
                ),
              ),
            ),
            // Scan frame.
            Center(
              child: SizedBox(
                width: 250,
                height: 250,
                child: CustomPaint(painter: _ScanFramePainter()),
              ),
            ),
            SafeArea(
              child: Column(
                children: <Widget>[
                  _buildAppBar(),
                  const Spacer(),
                  const Padding(
                    padding: EdgeInsets.only(bottom: 24),
                    child: Text(
                      'Point at a QR code to pay',
                      style: TextStyle(
                        fontFamily: _font,
                        fontSize: 14,
                        fontWeight: FontWeight.w500,
                        letterSpacing: 0.24,
                        color: Colors.white,
                      ),
                    ),
                  ),
                  _buildControls(),
                  const SizedBox(height: 8),
                  _buildMyCodeButton(),
                  const SizedBox(height: 12),
                ],
              ),
            ),
          ],
        ),
      ),
    );
  }
Wrapping the `Scaffold` in `Theme(data: ThemeData.dark(useMaterial3: true))` forces this one route dark no matter what the host app uses — a camera UI over a white theme would look broken. The body is a `Stack` with `fit: StackFit.expand`: the bottom layer is a `DecoratedBox` whose diagonal gradient runs `0xFF20242B → 0xFF14171B → 0xFF0C0E11`, dark greys that read as an unlit room on camera. The scan frame is a `Center`ed 250×250 `SizedBox` painted by `_ScanFramePainter`, deliberately outside the `SafeArea` column so it sits in the true middle of the display. Inside `SafeArea`, a `Spacer` shoves the "Point at a QR code to pay" prompt (14px, `w500`, `letterSpacing: 0.24`) and the control rows to the bottom, camera-app style.
The app bar and the Gallery / Torch row
  Widget _buildAppBar() {
    return Padding(
      padding: const EdgeInsets.fromLTRB(8, 4, 8, 4),
      child: Row(
        children: <Widget>[
          _CircleButton(icon: Icons.close_rounded, onTap: onBack),
          const Expanded(
            child: Text(
              'Scan to pay',
              textAlign: TextAlign.center,
              style: TextStyle(
                fontFamily: _font,
                fontSize: 17,
                fontWeight: FontWeight.w500,
                letterSpacing: 0.24,
                color: Colors.white,
              ),
            ),
          ),
          const SizedBox(width: 48),
        ],
      ),
    );
  }

  Widget _buildControls() {
    return const Row(
      mainAxisAlignment: MainAxisAlignment.center,
      children: <Widget>[
        _RoundControl(icon: Icons.photo_library_outlined, label: 'Gallery'),
        SizedBox(width: 40),
        _RoundControl(icon: Icons.flash_on_rounded, label: 'Torch'),
      ],
    );
  }
The bar is a plain `Row`: a `_CircleButton` with `Icons.close_rounded` (a scanner is modal, so it closes rather than goes back), the "Scan to pay" title centred inside an `Expanded`, then `const SizedBox(width: 48)` — exactly the close button's 40px circle plus its 8px padding — so the title is optically centred instead of drifting right. `_buildControls` is a fully `const` `Row` of two `_RoundControl`s, Gallery and Torch, separated by a 40px gap; being const, Flutter builds this subtree once and never rebuilds it.
The 'Show my QR code' pill
  Widget _buildMyCodeButton() {
    return Padding(
      padding: const EdgeInsets.symmetric(horizontal: 20),
      child: SizedBox(
        width: double.infinity,
        height: 54,
        child: Material(
          color: Colors.white.withValues(alpha: 0.12),
          borderRadius: BorderRadius.circular(9999),
          child: InkWell(
            borderRadius: BorderRadius.circular(9999),
            onTap: onMyCode,
            child: Row(
              mainAxisAlignment: MainAxisAlignment.center,
              children: const <Widget>[
                Icon(Icons.qr_code_2_rounded, size: 20, color: Colors.white),
                SizedBox(width: 8),
                Text(
                  'Show my QR code',
                  style: TextStyle(
                    fontFamily: _font,
                    fontSize: 15,
                    fontWeight: FontWeight.w500,
                    letterSpacing: 0.24,
                    color: Colors.white,
                  ),
                ),
              ],
            ),
          ),
        ),
      ),
    );
  }
The bottom pill is a 54px-tall, full-width `Material` at `Colors.white.withValues(alpha: 0.12)` — the same 12% white as every other control, which is what makes the chrome read as one frosted family over the feed. `BorderRadius.circular(9999)` is passed to both the `Material` and the `InkWell` so the ripple clips to the capsule instead of flashing a rectangle. Using `Material` + `InkWell` rather than a decorated `Container` is what buys that ripple at all. `onMyCode` fires here, handing navigation to the caller — typically a flip to the companion my-QR screen.
Two reusable frosted controls
class _CircleButton extends StatelessWidget {
  const _CircleButton({required this.icon, this.onTap});

  final IconData icon;
  final VoidCallback? onTap;

  @override
  Widget build(BuildContext context) {
    return Padding(
      padding: const EdgeInsets.all(8),
      child: Material(
        color: Colors.white.withValues(alpha: 0.12),
        shape: const CircleBorder(),
        child: InkWell(
          customBorder: const CircleBorder(),
          onTap: onTap,
          child: SizedBox(
            width: 40,
            height: 40,
            child: Icon(icon, size: 20, color: Colors.white),
          ),
        ),
      ),
    );
  }
}

class _RoundControl extends StatelessWidget {
  const _RoundControl({required this.icon, required this.label});

  final IconData icon;
  final String label;

  @override
  Widget build(BuildContext context) {
    return Column(
      mainAxisSize: MainAxisSize.min,
      children: <Widget>[
        Container(
          width: 56,
          height: 56,
          decoration: BoxDecoration(
            color: Colors.white.withValues(alpha: 0.12),
            shape: BoxShape.circle,
          ),
          child: Icon(icon, size: 24, color: Colors.white),
        ),
        const SizedBox(height: 8),
        Text(
          label,
          style: const TextStyle(
            fontFamily: FintechScanQrScreen._font,
            fontSize: 12,
            letterSpacing: 0.24,
            color: Colors.white70,
          ),
        ),
      ],
    );
  }
}
`_CircleButton` puts a 40×40 icon inside a `Material` with `shape: const CircleBorder()`, and crucially repeats that shape as the `InkWell`'s `customBorder` so the tap ripple is circular too; the 8px outer `Padding` quietly grows the touch target to 56px. `_RoundControl` is the labelled variant: a 56px circle `Container` with a 24px icon, then its caption at 12px in `Colors.white70` — slightly dimmer than the icons, so labels support rather than compete. Both again use `withValues(alpha: 0.12)` white, keeping every control legible over any feed brightness.
Painting the corner brackets and scan line
/// Draws four rounded corner brackets + a horizontal scan line for the frame.
class _ScanFramePainter extends CustomPainter {
  @override
  void paint(Canvas canvas, Size size) {
    final Paint p = Paint()
      ..color = Colors.white
      ..strokeWidth = 4
      ..strokeCap = StrokeCap.round
      ..style = PaintingStyle.stroke;
    const double len = 34;
    const double r = 18;
    final double w = size.width;
    final double h = size.height;

    // Top-left
    canvas.drawPath(
      Path()
        ..moveTo(0, len)
        ..lineTo(0, r)
        ..arcToPoint(const Offset(r, 0), radius: const Radius.circular(r))
        ..lineTo(len, 0),
      p,
    );
    // Top-right
    canvas.drawPath(
      Path()
        ..moveTo(w - len, 0)
        ..lineTo(w - r, 0)
        ..arcToPoint(Offset(w, r), radius: const Radius.circular(r))
        ..lineTo(w, len),
      p,
    );
    // Bottom-right
    canvas.drawPath(
      Path()
        ..moveTo(w, h - len)
        ..lineTo(w, h - r)
        ..arcToPoint(Offset(w - r, h), radius: const Radius.circular(r))
        ..lineTo(w - len, h),
      p,
    );
    // Bottom-left
    canvas.drawPath(
      Path()
        ..moveTo(len, h)
        ..lineTo(r, h)
        ..arcToPoint(Offset(0, h - r), radius: const Radius.circular(r))
        ..lineTo(0, h - len),
      p,
    );

    // Scan line.
    final Paint line = Paint()
      ..shader = const LinearGradient(
        colors: <Color>[Colors.transparent, Color(0xFF494FDF), Colors.transparent],
      ).createShader(Rect.fromLTWH(0, h * 0.5 - 1, w, 2))
      ..strokeWidth = 2;
    canvas.drawLine(
        Offset(8, h * 0.5), Offset(w - 8, h * 0.5), line);
  }

  @override
  bool shouldRepaint(covariant CustomPainter oldDelegate) => false;
}
`_ScanFramePainter` shares one stroke `Paint` — white, `strokeWidth: 4`, `StrokeCap.round`, `PaintingStyle.stroke` — across all four corners. Each bracket is a single three-segment `Path`: a straight arm of `len = 34` running into an `arcToPoint` with an 18px radius, then out along the other edge, mirrored per corner using `w` and `h`. Because only the corners are stroked and the sides stay open, the frame reads as a viewfinder rather than a rounded border. The scan line gets its own `Paint` whose shader is a `transparent → 0xFF494FDF → transparent` `LinearGradient` mapped onto a 2px-tall rect at `h * 0.5`, and `drawLine` insets 8px from each edge so the glow dies before touching the brackets. `shouldRepaint` returns `false` — nothing here depends on state.
Full code
The complete, ready-to-paste source. Free to use in your projects — one click copies it all.
import 'package:flutter/material.dart';

/// Scan QR — a mock camera viewfinder for paying via QR (Revolut-inspired).
///
/// Self-contained per CONVENTIONS.md: pure Flutter only, the exact design font
/// (Inter) is bundled under `fonts/`, no real camera/network (the "feed" is a
/// painted gradient), and the screen forces its own dark theme. The scan frame
/// with animated corner brackets and bottom controls read like a live scanner.
class FintechScanQrScreen extends StatelessWidget {
  const FintechScanQrScreen({
    super.key,
    this.onBack,
    this.onMyCode,
  });

  final VoidCallback? onBack;
  final VoidCallback? onMyCode;

  static const String _font = 'Inter';

  @override
  Widget build(BuildContext context) {
    return Theme(
      data: ThemeData.dark(useMaterial3: true),
      child: Scaffold(
        backgroundColor: Colors.black,
        body: Stack(
          fit: StackFit.expand,
          children: <Widget>[
            // Mock camera feed.
            const DecoratedBox(
              decoration: BoxDecoration(
                gradient: LinearGradient(
                  begin: Alignment.topLeft,
                  end: Alignment.bottomRight,
                  colors: <Color>[
                    Color(0xFF20242B),
                    Color(0xFF14171B),
                    Color(0xFF0C0E11),
                  ],
                ),
              ),
            ),
            // Scan frame.
            Center(
              child: SizedBox(
                width: 250,
                height: 250,
                child: CustomPaint(painter: _ScanFramePainter()),
              ),
            ),
            SafeArea(
              child: Column(
                children: <Widget>[
                  _buildAppBar(),
                  const Spacer(),
                  const Padding(
                    padding: EdgeInsets.only(bottom: 24),
                    child: Text(
                      'Point at a QR code to pay',
                      style: TextStyle(
                        fontFamily: _font,
                        fontSize: 14,
                        fontWeight: FontWeight.w500,
                        letterSpacing: 0.24,
                        color: Colors.white,
                      ),
                    ),
                  ),
                  _buildControls(),
                  const SizedBox(height: 8),
                  _buildMyCodeButton(),
                  const SizedBox(height: 12),
                ],
              ),
            ),
          ],
        ),
      ),
    );
  }

  Widget _buildAppBar() {
    return Padding(
      padding: const EdgeInsets.fromLTRB(8, 4, 8, 4),
      child: Row(
        children: <Widget>[
          _CircleButton(icon: Icons.close_rounded, onTap: onBack),
          const Expanded(
            child: Text(
              'Scan to pay',
              textAlign: TextAlign.center,
              style: TextStyle(
                fontFamily: _font,
                fontSize: 17,
                fontWeight: FontWeight.w500,
                letterSpacing: 0.24,
                color: Colors.white,
              ),
            ),
          ),
          const SizedBox(width: 48),
        ],
      ),
    );
  }

  Widget _buildControls() {
    return const Row(
      mainAxisAlignment: MainAxisAlignment.center,
      children: <Widget>[
        _RoundControl(icon: Icons.photo_library_outlined, label: 'Gallery'),
        SizedBox(width: 40),
        _RoundControl(icon: Icons.flash_on_rounded, label: 'Torch'),
      ],
    );
  }

  Widget _buildMyCodeButton() {
    return Padding(
      padding: const EdgeInsets.symmetric(horizontal: 20),
      child: SizedBox(
        width: double.infinity,
        height: 54,
        child: Material(
          color: Colors.white.withValues(alpha: 0.12),
          borderRadius: BorderRadius.circular(9999),
          child: InkWell(
            borderRadius: BorderRadius.circular(9999),
            onTap: onMyCode,
            child: Row(
              mainAxisAlignment: MainAxisAlignment.center,
              children: const <Widget>[
                Icon(Icons.qr_code_2_rounded, size: 20, color: Colors.white),
                SizedBox(width: 8),
                Text(
                  'Show my QR code',
                  style: TextStyle(
                    fontFamily: _font,
                    fontSize: 15,
                    fontWeight: FontWeight.w500,
                    letterSpacing: 0.24,
                    color: Colors.white,
                  ),
                ),
              ],
            ),
          ),
        ),
      ),
    );
  }
}

class _CircleButton extends StatelessWidget {
  const _CircleButton({required this.icon, this.onTap});

  final IconData icon;
  final VoidCallback? onTap;

  @override
  Widget build(BuildContext context) {
    return Padding(
      padding: const EdgeInsets.all(8),
      child: Material(
        color: Colors.white.withValues(alpha: 0.12),
        shape: const CircleBorder(),
        child: InkWell(
          customBorder: const CircleBorder(),
          onTap: onTap,
          child: SizedBox(
            width: 40,
            height: 40,
            child: Icon(icon, size: 20, color: Colors.white),
          ),
        ),
      ),
    );
  }
}

class _RoundControl extends StatelessWidget {
  const _RoundControl({required this.icon, required this.label});

  final IconData icon;
  final String label;

  @override
  Widget build(BuildContext context) {
    return Column(
      mainAxisSize: MainAxisSize.min,
      children: <Widget>[
        Container(
          width: 56,
          height: 56,
          decoration: BoxDecoration(
            color: Colors.white.withValues(alpha: 0.12),
            shape: BoxShape.circle,
          ),
          child: Icon(icon, size: 24, color: Colors.white),
        ),
        const SizedBox(height: 8),
        Text(
          label,
          style: const TextStyle(
            fontFamily: FintechScanQrScreen._font,
            fontSize: 12,
            letterSpacing: 0.24,
            color: Colors.white70,
          ),
        ),
      ],
    );
  }
}

/// Draws four rounded corner brackets + a horizontal scan line for the frame.
class _ScanFramePainter extends CustomPainter {
  @override
  void paint(Canvas canvas, Size size) {
    final Paint p = Paint()
      ..color = Colors.white
      ..strokeWidth = 4
      ..strokeCap = StrokeCap.round
      ..style = PaintingStyle.stroke;
    const double len = 34;
    const double r = 18;
    final double w = size.width;
    final double h = size.height;

    // Top-left
    canvas.drawPath(
      Path()
        ..moveTo(0, len)
        ..lineTo(0, r)
        ..arcToPoint(const Offset(r, 0), radius: const Radius.circular(r))
        ..lineTo(len, 0),
      p,
    );
    // Top-right
    canvas.drawPath(
      Path()
        ..moveTo(w - len, 0)
        ..lineTo(w - r, 0)
        ..arcToPoint(Offset(w, r), radius: const Radius.circular(r))
        ..lineTo(w, len),
      p,
    );
    // Bottom-right
    canvas.drawPath(
      Path()
        ..moveTo(w, h - len)
        ..lineTo(w, h - r)
        ..arcToPoint(Offset(w - r, h), radius: const Radius.circular(r))
        ..lineTo(w - len, h),
      p,
    );
    // Bottom-left
    canvas.drawPath(
      Path()
        ..moveTo(len, h)
        ..lineTo(r, h)
        ..arcToPoint(Offset(0, h - r), radius: const Radius.circular(r))
        ..lineTo(0, h - len),
      p,
    );

    // Scan line.
    final Paint line = Paint()
      ..shader = const LinearGradient(
        colors: <Color>[Colors.transparent, Color(0xFF494FDF), Colors.transparent],
      ).createShader(Rect.fromLTWH(0, h * 0.5 - 1, w, 2))
      ..strokeWidth = 2;
    canvas.drawLine(
        Offset(8, h * 0.5), Offset(w - 8, h * 0.5), line);
  }

  @override
  bool shouldRepaint(covariant CustomPainter oldDelegate) => false;
}
Plus bundled 1 binary asset (fonts/images). The CLI and MCP install those for you automatically.
Two faster ways to add it
Copy-paste works, but you can skip it entirely.
1. FlutterKit CLI
One command drops this screen — and its fonts — straight into your project.
$ flutterkit add fintech-scan-qr2. AI agent (MCP)
Connect FlutterKit's MCP server in Claude or Cursor and just ask your agent to install fintech-scan-qr — it fetches and writes the files for you.
FAQ
Is this QR scanner screen free to use, including commercially?
Yes. FlutterKit screens are free to use in personal and commercial apps alike — take the code from this page, ship it in a client project or your own fintech product, no attribution or sign-up needed.
Does this screen need a camera plugin or any packages?
No. The code.json lists zero packages: the "feed" is a gradient `DecoratedBox` and the frame is a `CustomPainter`, so it runs on pure Flutter. The only asset is the Inter font, referenced by `fontFamily: 'Inter'` — bundle it in your `pubspec.yaml` fonts section, or load it with google_fonts if you prefer.
Which Flutter version does this code require?
Flutter 3.27 or newer, because the frosted controls use `Colors.white.withValues(alpha: 0.12)`. On an older SDK, replace each `withValues(alpha: x)` with `withOpacity(x)`; the constructor's `super.key` also assumes Dart 2.17+, which any recent Flutter already has.
How do I wire this up to a real camera and actually decode QR codes?
Add a scanner package such as mobile_scanner, then replace only the bottom `DecoratedBox` layer of the `Stack` with its `MobileScanner` preview — the painted frame, prompt and controls all stay as-is on top. Hook Torch to the controller's `toggleTorch()` and Gallery to an image picker feeding `analyzeImage`, and handle the decoded payload in a detection callback.
The scan line is static — how do I make it sweep up and down?
Give `_ScanFramePainter` an `Animation<double>` field, pass it to `super(repaint: animation)` in the constructor, and swap the fixed `h * 0.5` for `h * animation.value` in both the shader rect and `drawLine`. Drive it from a `StatefulWidget` wrapper with a repeating `AnimationController` (about 2 seconds, `reverse: true` for a bounce).


